Wednesday, August 11, 2010

Fresh Blackberry Pie

This time of year, there's just not much better than a Fresh Blackberry Pie loaded with ripe, sweet, plump blackberries. I look forward to it every year. And for reasons that have mostly to do navigating what always seems to be a busy summer and a short blackberry season more years than not I don't make it.
But this year - the stars aligned and there's fresh blackberry pie! Hurray!!! Now the only problem is that one pie will probably not be enough... Oh well, it's super easy to make and I got extra berries. :) So what's the beauty of this pie? 

1) The only thing you bake is the crust. 2) The berries aren't baked so they don't have that cloying gummy sweet aspect most blackberry pies do. 3)Those luscious berries are held together with a nice light sweet binding that comes together with the berries and the crispness of the sweet crust for a heady taste of summer on your fork. 

Feeling inspired? Here's the recipe, it'll be done and chilling in less than 45 minutes:

Sweet Pie Crust:
Makes one 9 inch crust  


1 cup  flour
1/2 cup  margarine
1/4 cup  powdered sugar
1/4 cup  walnuts, chopped
 
Mix crust and pat into a pie pan. Do not turn over edges of pan. Bake at 400 for 12-15 minutes, then cool.

Fresh Berry Pie:
1 Sweet Pie Crust
3 Tbs  cornstarch
1 cup  sugar
1 cup  water
2 Tbs  corn syrup, light
3 Tbs  black cherry jello, regular (not sugarfree)
4 cups  blackberries, fresh

Cook until thick cornstarch, sugar, water. Add cornsyrup and jello. Cool to luke warm. Place berries on bottom of pie plate on crust. Pour 1/2 of jello mixture over. Place remainder of berries in the pie pan. Pour remainder of jello mixture over the top of berries. Refridgerate 4 hours or overnight. 

You can substitute strawberries and strawberry jello or whatever berry/fruit you'd like by pairing it with the appropriate jello flavor.

Sunday, August 8, 2010

Great Grandma Dena's Apple Crisp

I love apples. There I said it. :) I love them plain and raw, and I especially love them in desserts. Perhaps the easiest and most reliable apple dessert I have is an Apple Crisp from my Great Grandma Dena. It's the perfect balance of butter, sugar, and cinnamon to top any bunch of apples - anytime, especially in the fall but when you find yourself on a hot August night with a bunch of apples that haven't lived up to your eating-raw expectations and absolutely no chocolate in the house - it's the perfect solution.

Here's the recipe in case you find yourself in the same pickle.


Great Grandma Dena's Apple Crisp


4-6 cups  apples, sliced
1 Tbs  lemon juice
1/4 cup  white flour
1/4 cup  wheat flour
1 cup  rolled oats
1/2 cup  brown sugar
1 tbsp cinnamon
1/2 tsp
1/3 cup 
salt
butter, melted


Place apples in a greased 13x9 shallow pan. Sprinkle with lemon juice. In a separate bowl, combine remaining ingredients. Mix until crumbly. Sprinkle over apples. Bake at 375 for 30 minutes until nicely browned.


Servings: 6

Sunday, July 25, 2010

Sourdough Pan Bread

Long overdue, I'm finally posting this recipe I found for Simple Sourdough Pan Bread over at Carl's Friends. This is the easiest, tastiest, and most reliable sandwich bread I've ever tried to make. It works great from a sourdough starter or from a sponge start. (No sourdough? Just add equal parts water and flour for the starter that's called for and add a packet of yeast. I'll be going fine by morning.)

 You owe it to yourself to try this bread - in the summer though, keep a watch on it during the final rise, it'll blow the proof faster than you can imagine. I came home the other day after running errands while it proofed to find it rolling down the side of my breadpan. Not to worry though, I punched it down, reshaped and let it rise again, it wasn't the prettiest loaf I've made, but it tasted just fine.


Instructions for simple Sourdough Pan Bread using Carl Griffith's 1847 Oregon Trail Sourdough Starter and a Kitchen Aid K-45 mixer

Put into the mixing bowl:
1 cup fully active culture
2 cups water
2 cups bread flour
-----------------
Mix manually. Let sit covered for 8 or 10 hr.
-----------------
Manually mix in: 2 tsp. salt & 3 more cups flour. Machine knead ~10 min. at low speed while adjusting consistency by adding 1 cup more or less of additional flour, until the dough no longer sticks to bowl or fingers.
-----------------
Remove from mixer, hand knead briefly, and split dough. Work in more flour while hand kneading each piece. (total cups flour=6+, possibly<6) Well, I also bat each piece around in the bowl with the dough hook, at medium speed. (Bat one while kneading the other, repeat twice.)
-----------------
Form and reform each piece several times during 20 or 30 minutes, otherwise keeping covered. The dough should be soft enough to  easily reseal a seam, but should not stick to hands. Finally form to oblong and cut tops with a razor blade, 10 or 12 diagonal cuts. Dough as finally formed should be silky smooth.
-----------------
Place in pans*, allow to rise 5 to 8 hrs., enclosed to retain moisture, until top is an inch or two higher than the top of the pan. (3 in. is possible!) Bake 40 min. at ~375°F. Cold start OK. (Expect little "oven push", or none.)
-----------------
*usual Teflon-coated steel pans, capacity ~67 fl. oz. (~8-1/3 cups) to brim; Times are approximate, for ~70°F -- Shorten for summertime.
-----------------
Cans as measures: A 16 ounce can is good for fetching the first 2 cups of flour, and a 32 ounce can gets most of the rest. Keep cans with flour.

Sunday, June 6, 2010

Pain sur Poolish (Daily Bread)

I found this wonderful website: http://www.thefreshloaf.com/ and decided  I simply had to spend some time on it. There is a great basic recipe for "Daily Bread" or Pain sur Poolish. This is where I started my adventure Fresh Loaf.

As the commentary predicted, it is WET. So I added enough extra flour to get it to together. Also since I have Active Yeast, not instant at the house I added an extra 1/2 teaspoon of that to main Dough. It rose as at should, shaped and let it go for it's final rise. Before putting it in the oven I brushed it with egg yolk and sliced it. My oven goes up to 550, so I started it there with one loaf on each cooking stone and with about 4 ice cubes for steam.  It baked for 5 minutes at the high heat, then I cut the heat to 475 and baked for the remaining time.

This is easily the best tasting, best looking, and best bread I 've ever made. Great flavor, nicely chewy crust, gorgeous crumb. I'll definitely have to make it again -- tomorrow. :)

In the event the recipe gets moved from the original blog, I've reproduced it here. You owe it to yourself to read the commentary on it from the original site here. My comments are in italics.

Pain Sur Poolish (Daily Bread)


Poolish

1 cup flour

1 cup water

1/4 tsp instant yeast

Final Dough

1 lb flour

10-12 oz water (I used 10, and would try 8 next time)

1 tsp instant yeast (I used 1-1/2 tsp Active Dry Yeast)

2 tsp salt

all of the poolish  

  1. Combine the ingredients for the poolish in a small bowl the night before baking. Cover the bowl with plastic wrap and leave the poolish out at room temperature overnight.
  2. The next day, prepare the final dough, either by using the autolyse method of flour and water first then the rest of the ingredients with minimal mixing or by combining them all and mixing until you have decent gluten development (8 to 10 minutes).
  3. I typically fold the dough once an hour twice during primary fermentation, then shape the loaves and give them a longer final rise, typically around 90 minutes. Meanwhile, my oven and baking stone are preheating as hot as they can safely go. (550 is the hottest my oven will go. Brushed with an egg yolk before docking. Incidentally couldn't dock with a razor blade - docked with a serrated knife instead).
  4. Baking, with steam, takes me 20 minutes, 5 minutes or so at maximum oven temperature, the remainder at 450-475. I rotate the loaves once half way through the baking.
  5. That is it. Simple, tasty, and a great recipe to practice with.

Yield: 2 loaves

Saturday, June 5, 2010

S'mores Cookie Bars

Mike's grilling salmon on a cedar plank tonight, so it seemed like s'mores fit the bill. (Besides, I'm always up for marshmallow anything.) I found this recipe on the BakingBites.com blog that served as the foundation for my S'mores bars.

I offer it here with my variations:

S’More Cookie Bars

/2 cup butter, room temperature
1/4 cup brown sugar
1/2 cup sugar
1 large egg
1 tsp vanilla extract
1 1/3 cups all purpose flour
3/4 cup graham cracker crumbs
1 tsp baking powder
1/4 tsp salt
1 cup milk chocolate chips
1 cup semi sweet chocolate chips
1 jar marshmallow creme/fluff (not melted marshmallows)
2 cups mini marshmallows
1/2 cup crushed graham crackers
Preheat oven to 350°F. Grease a 13x9 baking pan.

  1. In a large bowl, cream together butter and sugar until light. Beat in egg and vanilla.
  2. In a small bowl, whisk together flour, graham cracker crumbs, baking powder and salt. Add to butter mixture and mix at a low speed until combined. Press dough into an even layer on the bottom of the prepared pan.
  3. Spread the jar of marshmallow fluff on the cookie dough in an even layer.
  4. Sprinkle milk and semi-sweet chocolate chips on the marshmallow fluff.
  5. Sprinkle mini-marshmallows over the chocolate
  6. Sprinkle remaining graham crackers over the marshmallows
  7. Bake for 20 minutes then cover with aluminum foil and bake another 15 minutes.
  8. Cool completely before cutting into bars
Yummy!

Monday, March 29, 2010

Daring Baker's Challenge: March 2010 Orange Tian


The 2010 March Daring Baker’s challenge was hosted by Jennifer of Chocolate Shavings. She chose Orange Tian as the challenge for this month, a dessert based on a recipe from Alain Ducasse’s Cooking School in Paris. You can find your copy of these recipes on the Daring Kitchen website.

I have to admit, I was not looking forward to this challenge. I'm not a big fan of marmalade, nor orange desserts. And the individual servings looked tedious and troublesome. Therefore, I put it off until quite late in the month.

I do have to admit though, the marmalade is the best marmalade I've ever had -- and would chose to have it on toast. (In fact, it's pretty impressive on homemade brioche!).

I ended up making the Orange Tian in a tart pan, and assembled it right side up, rather than upside down and flipped as the instructions call for. It seemed appropriate since the base was a Pate Sablee. The completed dessert also surpassed my expectations and was surprisingly good.

Would I make it again? Not sure, but I wouldn't be opposed to it -- that's for sure. And that marmalade might just make a regular appearance in our household.
Posted by Picasa

Saturday, February 27, 2010

Daring Baker's Challenge: Tiramisu

The February 2010 Daring Bakers’ challenge was hosted by Aparna of My Diverse Kitchen and Deeba of Passionate About Baking. They chose Tiramisu as the challenge for the month. Their challenge recipe is based on recipes from The Washington Post, Cordon Bleu at Home and Baking Obsession. (Recipe is located here)

OK, I  have to admit, I wasn't pleased to see that this was the challenge this month. I'm not a fan of Tiramisu--I know, sacrilege to those of you who adore it, but between the soggy cookies/cake and the overly alcohol flavor, I never liked it. Nevertheless, the point of Daring Bakers is to try something you otherwise wouldn't have -- and this was definately the case.

The most difficult part of this challenge was making the 4, count them 4, different components to the creme before mixing it together. It was interesting to make Mascarpone Cheese from scratch, but also making zabaglione, pastry cream, and whip cream to mix together was --- time consuming. It would seem that since 2 of the 4 items have to be cooked in what amounts to a double boiler, that perhaps they could have been combined.

I ended up using espresso for the flavoring -- instead of the marsala. And I used a Danish Pastry flavoring in place of the Rum Extract. I have to admit, it was pretty good -- better than any tiramisu I've ever had before, that's for sure. The recipe called for it to be assembled in an 8x8 pan, but I didn't think I had enough ladyfingers for 3 layers in an 8x8 pan, so I assembled mine in a bread pan.

Even after waiting overnight to taste it, the ladyfinger biscuits held enough texture to make interesting -- although if I were to make it again, I think adding toasted hazelnuts or chocolate nibs would really enhance the experience.

Will I make it again? Not sure, but perhaps for company with lots of notice -- then again, maybe I'll make the easy and delicous Carmel Walnut Banana Torte.


Sunday, February 21, 2010

Carmel Walnut Banana Torte

A couple of weeks ago (on 2/7), we got a new Kitchen Aid mixer. Woo Hoo! Thank you to Allyson's Kitchen in Ashland. They had an awesome Professional series in the Azur color the kitchen is accented with. It was time to upgrade to a more powerful mixer and I've looked for the right one for some time, it was pure happenstance we found it. To top it off, we were lucky enough to sell our other Kitchen Aid easily and quickly thanks to Craigslist, so it was a very inexpensive upgrade.

One unexpected bonus of the new Kitchen Aid was the recipe book that came with it, and the unexpectedly delicious Banana Carmel Walnute Torte (recipe below). With the slightly disconcerting realization that my cake pans apparently didn't make the move (or at least can't be located after), enough pans of about the same size were cobbled together to make the utterly delicious three layer cake. It's super easy and about the best dessert that ever happened.

Thanks to Kitchen Aid, the new Azur mixer, and the wonderful recipe! This one will definately be made again...soon!


Carmel Walnut Banana Torte Recipe

Topping
  • 1 cup firmly packed brown sugar
  • 1/2 cup margarine or butter
  • 1/4 cup heavy cream
  • 1 cup chopped walnuts
 Cake
  • 1 1/2 cups sugar
  • 1/2 cup softened margarine or butter
  • 1 cup ripe banana, mashed
  • 3 eggs
  • 2 1/2 cups all-purpose flour
  • 1 1/4 tsp baking powder
  • 1 tsp baking soda
  • 1/2 tsp salt
  • 3/4 cup buttermilk
Filling
  • 1/2 cup sugar
  • 3 Tbs all-purpose flour
  • 1/4 tsp salt
  • 1 cup low-fat milk or whole milk
  • 1 egg, beaten
  • 1 tsp vanilla
  • 1 Tbs margarine or butter
  • 2 medium thinly sliced bananas
 Whipped Topping 
  • 1/2 cup cream, whipped (sweetening optional)
TOPPING:
  1. Place brown sugar, margarine, and cream in a small saucepan. Heat over low heat just until margarine melts, stirring constantly.
  2. Pour over bottoms of three 8" or 9" round baking pans, & sprinkle with walnuts.
CAKE: 
  1. Place sugar and margarine in mixer bowl and cream for about 2 minutes.
  2. Add banana and vanilla, mix thoroughly.
  3. Add eggs, one at a time, mixing about 15 seconds between each addition on low speed.
  4. Combine flour, baking powder, baking soda, and salt in small bowl.
  5. Add half of the flour mixture to the sugar mixture and mix for about 30 seconds on low speed.
  6. Add buttermilk and remaining flour mixture. Gradually increase spead to high and beat about 30-45 seconds.
  7. Spread batter evenly over nut mixture in pans.
  8. BAKE: 350°F for 25 - 30 minutes until toothpick inserted in center comes out clean.
  9. Cool in pans about 3 minutes. Remove from pans by inverting on to wire racks. (This is very important, if you don't let them cool long enough, the topping runs off the cake, too cool, and it stays in the pan).
 FILLING: 
  1. Combine sugar, flour and salt in medium saucepan.
  2. Gradually stir in milk.
  3. Heat to boiling over medium heat, stirring constantly.
  4. Beat the egg in a separate bowl.
  5. Stir 4 to 5 tablespoons of hot mixture into beaten egg, 1 tablespoon at a time, mixing between each addition.
  6. Pour egg mixture into saucepan with remaining hot mixture. Cook until mixture is thick & bubbly, stirring constantly.
  7. Remove from heat and stir in vanilla and margarine. Cool slightly.
  8. Refrigerate 1 hour or more until cake is cool and ready to assemble.
 ASSEMBLE TORTE: 
  1. (Save nicest looking layer for the top). Place one cake layer, nut side up on serving plate.
  2. Spread with half of filling. Arrange about half of banana slices over filling.
  3. Top with second layer, nut side up. Spread with remaining filling and banana slices.
  4. Top with remaining cake layer, nut side up.
  5. Top with whipped cream just before serving.
  6. Store in refrigerator.
 Recipe Source: KitchenAid Stand Mixer Book

Wednesday, January 27, 2010

Daring Baker Challenge: January 2010 - Graham Wafers and Nanaimo Bars

The January 2010 Daring Bakers’ challenge was hosted by Lauren of Celiac Teen. Lauren chose Gluten-Free Graham Wafers and Nanaimo Bars as the challenge for the month. The sources she based her recipe on are 101 Cookbooks and http://www.nanaimo.ca/. You can find your copy of these recipes on the Daring Kitchen website.

I am really excited about this challenge! I've wanted to try to make Nanaimo Bars a number of times, but for one reason or another haven't made them yet. I'm also excited to get to try my hand at making graham wafers -- this should be a FUN challenge. Thanks Lauren for presenting it!

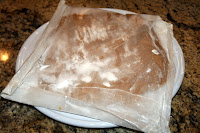
So first -- the Graham Crackers. Highly optimistic I started this endeavor. I originally started to do the GF version as I had all the appropriate flours already on hand. As I added the butter, and after cutting the butter in with the flour, the correct coarse "meal" appeared. After adding the honey, milk, and vanilla to the mixture, I felt confident I was well on my way. Lauren said it would be a wet sticky dough -- boy o boy, she wasn't kidding!

After attempting to roll and pat this out, only to find that I couldn't get it up off the counter in one piece -- in fact it had glued itself to the counter. I hoped it would get resolved as it cooled again in the refridgerator and bundled it up for a chill.

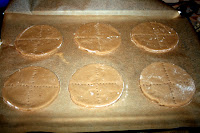
Alas, even after the chill, it was still too sticky to deal with. So back to the mixer it went and I added about 1 more cup of flour to get it to a more appropriate state.

After the addition of more flour it was much easier to deal with, although still quite sticky and fragile. To expedite the process, I cut the crackers out with a 4 inch English Muffin mold. This worked fairly well but has resulted in round Graham Crackers. C'est la vie!
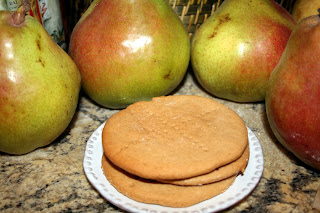
Here's hoping that home-made graham crackers are worth the effort or this is a one-time only adventure. :)

Now for the tasting -- pretty good. I'm still not sure it's worth the effort everyday, but the flavors and textures are nothing like the store-bought version. Definately worth doing at least once in a lifetime.


By comparison to the Graham Crackers, the Nanaimo Bars were easy! Just three no-bake layers, and chilling time. The fact that I still lack a double boiler meant that I had to haul out the pyrex bowl over the sauce pan again (honestly that's the fifth time in the last month and a half!). I decided toasting the almonds and coconut would be prudent before I added them to the mixture so set about doing just that.

I had to try the tempering process I've seen a few times as I added the egg into the hot chocolate and didn't want it scrambled. (It worked!) There was a small moment of concern when I realized halfway through the second layer that I had left the Graham Crackers out of the first layer. But no worries, scooped it back into a bowl, re-softened the chocolate mixture and added in the Graham Crackers -- that made it look more like it should have to begin with.

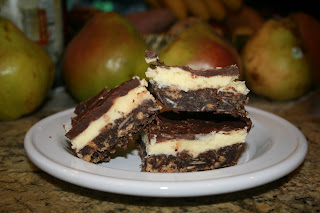
Layer two was uneventful -- but yummy bowl scrapings to be had. Layer 3 needed to cool a little longer than I gave it as it was difficult to spread since it kept melting layer 2. But in the end, it got spread and stuck in the refrigerator to cool.

The taste is divine and the Nanaimo challenge one worth repeating -- although next time with store bought Graham Crackers.

The challenge was lots of fun and I'm looking forward to next month's challenge. Thanks again Lauren!
Posted by Picasa

Saturday, January 16, 2010

French Baguettes


I ordered a wonderful little book by Peter Mayle recently called "Confessions of a French Baker." It arrived Friday -- what fun! So seeing as it's a 3-day weekend, I dove in and gave Baguettes a try. Anything that promises to be this good is certainly worth a little time and effort -- which is a good philosophy when you're contemplating making Baguettes. 


While the ingredient list is not complicated, in fact it's just 4 ingredients long: flour, salt, yeast, and water, the "complicated" part is the mix, rest, knead, rise, shape, rise, shape, rise series of steps. None of these steps are hard, given that Peter Mayle and Gerard Auzet (AKA the French Baker) do a good job explaining what you're going for in each and every step.


The results, were impressive. A nice crust, spongy, yeasty goodness inside and when buttered -- divine.


I held two loaves back from baking in the refrigerator in order to try baking them off tomorrow. If it works, this may become a weekend ritual. Honestly, who can resist fresh-from-the-oven French Bread?
                                ...certainly not me!

PS -- the refrigerator plan didn't work -- that's ok though it'll still be worth it fof the day of.

Saturday, January 9, 2010

Harvest Pear Crisp and Vanilla Ice Cream


We had some more of those amazing pears from Harry and David. They're Comice Pears and much too large to fit into the gift boxes  -- such a shame! Turns out that the brand name of Royal Riviera Pears from Harry and David are in fact just "perfect" Comice Pears. So now you too know the secret, when you see Comice Pears, buy them - they're amazing. The key I learned some time ago about pears is that they need to sit out at room temperature about a week before they are ready to eat. You'll know they're ripe when the top of the pear, near the stem, feels like the meaty part of web of your hand between your thumb and index finger. When they feel about the same, the pears are perfect for eating.

In search of something to do with the 5 monster pears that were perfectly ripe on our countertop, I came across a recipe from Sandie at Inn Cuisine for a Harvest Pear Crisp. Her recipe is as follows:

Harvest Pear Crisp

Fruit Mixture
4 Anjou or Bartlett pears, cored and cut lengthwise in 1/2 inch slices (peeled or not peeled, your preference) 1 Tbs lemon juice (to prevent pear slices from browning)
1 Tbs cornstarch
1 tsp cinnamon
1/3 cup granulated sugar

Crisp Mixture
1/3 cup all-purpose flour
1/2 cup packed brown sugar
1/2 tsp salt
1/2 tsp cinnamon
3 Tbs chilled butter, cut into small pats
1/2 cup oats (quick cooking or old fashioned, your preference)
1/4 cup walnuts or pecans, chopped (optional)

Procedure
  1. Preheat oven to 375 degrees F for baking.
  2. Combine sliced pears in lemon juice. In small bowl, thoroughly combine cornstarch, cinnamon, and granulated sugar. Add to pear slices, mix together, place in a greased 8×8 inch baking dish, and set aside.
  3. In a food processor, mix flour, brown sugar, salt, and cinnamon, whirring until combined. Add butter; pulse in 6 times. Add oats and chopped nuts; pulse 2 more times. Sprinkle this mixture over pear slices already in baking dish.
  4. Bake in a 375 degree F oven for approximately 40-43 minutes, or until done.
Servings: 4
Since I had 5 huge pears, I doubled the recipe and put it into at 13x9 pan. Those pears were so juicey that I'm confident that cornstarch was a necessary component -- I just hope it was enough! As promised the smell of cinnamon and pears baking permeated the whole house and made our mouths water.


And the taste...cinnamon, pear goodness that simply must be served with vanilla ice cream, so I found a quick No-Cook Vanilla Ice Cream recipe, surpised myself by actually having all the ingredients on hand and whipped up a batch to go with it. The recipe is as follows:

No-Cook Vanilla Ice Cream


14 ounces sweetened condensed milk
12 ounces evaporated milk
2 Tbs sugar
2 tsp vanilla
2 cups whole milk
  1. Whisk all ingredients in a 2-quart pitcher or large bowl until blended. Cover and chill 30 minutes. 
  2. Pour milk mixture into freezer container of a 1-quart electric ice-cream maker, and freeze according to manufacturer's instructions. (Instructions and times will vary.) 
  3. Remove container with ice cream from ice-cream maker, and place in freezer 15 minutes. Transfer to an airtight container; freeze until firm, about 1 to 1 1/2 hours.
The results -- cinnamon, pear, oat crisps, and vanilla ice cream melting all through it -- perfection!

Saturday, January 2, 2010

The Daring Baker: January 2010 Challenge

Well, I can't tell you what the January 2010 Daring Baker's Challenge is yet -- you'll have to wait until the 27th to find out. It's not my rules, it's the challenge's rules. But what what I can tell you is that I'm very excited to complete the challenge. It's actually a two part challenge. Part one got done today and part two is scheduled for tomorrow.

There was a spot of trouble on today's component, but I think it came out OK. Tomorrow's should be MUCH easier. The recipe for tomorrow is one I've wanted to make for quite a while, but generally consider it much too late at night to actually accomplish. So this should be lots of fun--and tasty too!

Enough -- can't say anything meaningful, so until next Wild Thyme in the Kitchen... :)