Wednesday, January 27, 2010

Daring Baker Challenge: January 2010 - Graham Wafers and Nanaimo Bars

The January 2010 Daring Bakers’ challenge was hosted by Lauren of Celiac Teen. Lauren chose Gluten-Free Graham Wafers and Nanaimo Bars as the challenge for the month. The sources she based her recipe on are 101 Cookbooks and http://www.nanaimo.ca/. You can find your copy of these recipes on the Daring Kitchen website.

I am really excited about this challenge! I've wanted to try to make Nanaimo Bars a number of times, but for one reason or another haven't made them yet. I'm also excited to get to try my hand at making graham wafers -- this should be a FUN challenge. Thanks Lauren for presenting it!

So first -- the Graham Crackers. Highly optimistic I started this endeavor. I originally started to do the GF version as I had all the appropriate flours already on hand. As I added the butter, and after cutting the butter in with the flour, the correct coarse "meal" appeared. After adding the honey, milk, and vanilla to the mixture, I felt confident I was well on my way. Lauren said it would be a wet sticky dough -- boy o boy, she wasn't kidding!
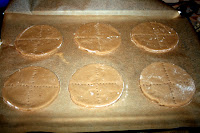
After attempting to roll and pat this out, only to find that I couldn't get it up off the counter in one piece -- in fact it had glued itself to the counter. I hoped it would get resolved as it cooled again in the refridgerator and bundled it up for a chill.

Alas, even after the chill, it was still too sticky to deal with. So back to the mixer it went and I added about 1 more cup of flour to get it to a more appropriate state.

After the addition of more flour it was much easier to deal with, although still quite sticky and fragile. To expedite the process, I cut the crackers out with a 4 inch English Muffin mold. This worked fairly well but has resulted in round Graham Crackers. C'est la vie!
Here's hoping that home-made graham crackers are worth the effort or this is a one-time only adventure. :)

Now for the tasting -- pretty good. I'm still not sure it's worth the effort everyday, but the flavors and textures are nothing like the store-bought version. Definately worth doing at least once in a lifetime.


By comparison to the Graham Crackers, the Nanaimo Bars were easy! Just three no-bake layers, and chilling time. The fact that I still lack a double boiler meant that I had to haul out the pyrex bowl over the sauce pan again (honestly that's the fifth time in the last month and a half!). I decided toasting the almonds and coconut would be prudent before I added them to the mixture so set about doing just that.

I had to try the tempering process I've seen a few times as I added the egg into the hot chocolate and didn't want it scrambled. (It worked!) There was a small moment of concern when I realized halfway through the second layer that I had left the Graham Crackers out of the first layer. But no worries, scooped it back into a bowl, re-softened the chocolate mixture and added in the Graham Crackers -- that made it look more like it should have to begin with.

Layer two was uneventful -- but yummy bowl scrapings to be had. Layer 3 needed to cool a little longer than I gave it as it was difficult to spread since it kept melting layer 2. But in the end, it got spread and stuck in the refrigerator to cool.

The taste is divine and the Nanaimo challenge one worth repeating -- although next time with store bought Graham Crackers.

The challenge was lots of fun and I'm looking forward to next month's challenge. Thanks again Lauren!
Posted by Picasa

Saturday, January 16, 2010

French Baguettes


I ordered a wonderful little book by Peter Mayle recently called "Confessions of a French Baker." It arrived Friday -- what fun! So seeing as it's a 3-day weekend, I dove in and gave Baguettes a try. Anything that promises to be this good is certainly worth a little time and effort -- which is a good philosophy when you're contemplating making Baguettes. 


While the ingredient list is not complicated, in fact it's just 4 ingredients long: flour, salt, yeast, and water, the "complicated" part is the mix, rest, knead, rise, shape, rise, shape, rise series of steps. None of these steps are hard, given that Peter Mayle and Gerard Auzet (AKA the French Baker) do a good job explaining what you're going for in each and every step.


The results, were impressive. A nice crust, spongy, yeasty goodness inside and when buttered -- divine.


I held two loaves back from baking in the refrigerator in order to try baking them off tomorrow. If it works, this may become a weekend ritual. Honestly, who can resist fresh-from-the-oven French Bread?
                                ...certainly not me!

PS -- the refrigerator plan didn't work -- that's ok though it'll still be worth it fof the day of.

Saturday, January 9, 2010

Harvest Pear Crisp and Vanilla Ice Cream


We had some more of those amazing pears from Harry and David. They're Comice Pears and much too large to fit into the gift boxes  -- such a shame! Turns out that the brand name of Royal Riviera Pears from Harry and David are in fact just "perfect" Comice Pears. So now you too know the secret, when you see Comice Pears, buy them - they're amazing. The key I learned some time ago about pears is that they need to sit out at room temperature about a week before they are ready to eat. You'll know they're ripe when the top of the pear, near the stem, feels like the meaty part of web of your hand between your thumb and index finger. When they feel about the same, the pears are perfect for eating.

In search of something to do with the 5 monster pears that were perfectly ripe on our countertop, I came across a recipe from Sandie at Inn Cuisine for a Harvest Pear Crisp. Her recipe is as follows:

Harvest Pear Crisp

Fruit Mixture
4 Anjou or Bartlett pears, cored and cut lengthwise in 1/2 inch slices (peeled or not peeled, your preference) 1 Tbs lemon juice (to prevent pear slices from browning)
1 Tbs cornstarch
1 tsp cinnamon
1/3 cup granulated sugar

Crisp Mixture
1/3 cup all-purpose flour
1/2 cup packed brown sugar
1/2 tsp salt
1/2 tsp cinnamon
3 Tbs chilled butter, cut into small pats
1/2 cup oats (quick cooking or old fashioned, your preference)
1/4 cup walnuts or pecans, chopped (optional)

Procedure
  1. Preheat oven to 375 degrees F for baking.
  2. Combine sliced pears in lemon juice. In small bowl, thoroughly combine cornstarch, cinnamon, and granulated sugar. Add to pear slices, mix together, place in a greased 8×8 inch baking dish, and set aside.
  3. In a food processor, mix flour, brown sugar, salt, and cinnamon, whirring until combined. Add butter; pulse in 6 times. Add oats and chopped nuts; pulse 2 more times. Sprinkle this mixture over pear slices already in baking dish.
  4. Bake in a 375 degree F oven for approximately 40-43 minutes, or until done.
Servings: 4
Since I had 5 huge pears, I doubled the recipe and put it into at 13x9 pan. Those pears were so juicey that I'm confident that cornstarch was a necessary component -- I just hope it was enough! As promised the smell of cinnamon and pears baking permeated the whole house and made our mouths water.


And the taste...cinnamon, pear goodness that simply must be served with vanilla ice cream, so I found a quick No-Cook Vanilla Ice Cream recipe, surpised myself by actually having all the ingredients on hand and whipped up a batch to go with it. The recipe is as follows:

No-Cook Vanilla Ice Cream


14 ounces sweetened condensed milk
12 ounces evaporated milk
2 Tbs sugar
2 tsp vanilla
2 cups whole milk
  1. Whisk all ingredients in a 2-quart pitcher or large bowl until blended. Cover and chill 30 minutes. 
  2. Pour milk mixture into freezer container of a 1-quart electric ice-cream maker, and freeze according to manufacturer's instructions. (Instructions and times will vary.) 
  3. Remove container with ice cream from ice-cream maker, and place in freezer 15 minutes. Transfer to an airtight container; freeze until firm, about 1 to 1 1/2 hours.
The results -- cinnamon, pear, oat crisps, and vanilla ice cream melting all through it -- perfection!

Saturday, January 2, 2010

The Daring Baker: January 2010 Challenge

Well, I can't tell you what the January 2010 Daring Baker's Challenge is yet -- you'll have to wait until the 27th to find out. It's not my rules, it's the challenge's rules. But what what I can tell you is that I'm very excited to complete the challenge. It's actually a two part challenge. Part one got done today and part two is scheduled for tomorrow.

There was a spot of trouble on today's component, but I think it came out OK. Tomorrow's should be MUCH easier. The recipe for tomorrow is one I've wanted to make for quite a while, but generally consider it much too late at night to actually accomplish. So this should be lots of fun--and tasty too!

Enough -- can't say anything meaningful, so until next Wild Thyme in the Kitchen... :)